アーティスト、プレゼンター、そして大規模な制作現場など、あらゆる場面でワイヤレスラペルマイクはレコーディングに最適です。不要な配線の煩雑さを解消し、セットアップも簡単で、パフォーマンス中に自由に動き回ることができます。また、様々なデバイスに使用できます。スムーズな撮影のためにどのように接続すれば良いのでしょうか?フレームをすっきりと保つためにマイクを隠すにはどうすれば良いのでしょうか?この記事では、これらの問題を解決するためのヒントをご紹介します。
ワイヤレスラペルマイクをカメラ、スマートフォン、コンピューターに接続するヒント
高品質なオーディオを実現するための最初の、そして最も重要なステップは接続です。 ワイヤレスマイクをカメラ、スマートフォン、そしてカメラに接続する方法はそれぞれ異なるため、以下で個別に説明します。
カメラ
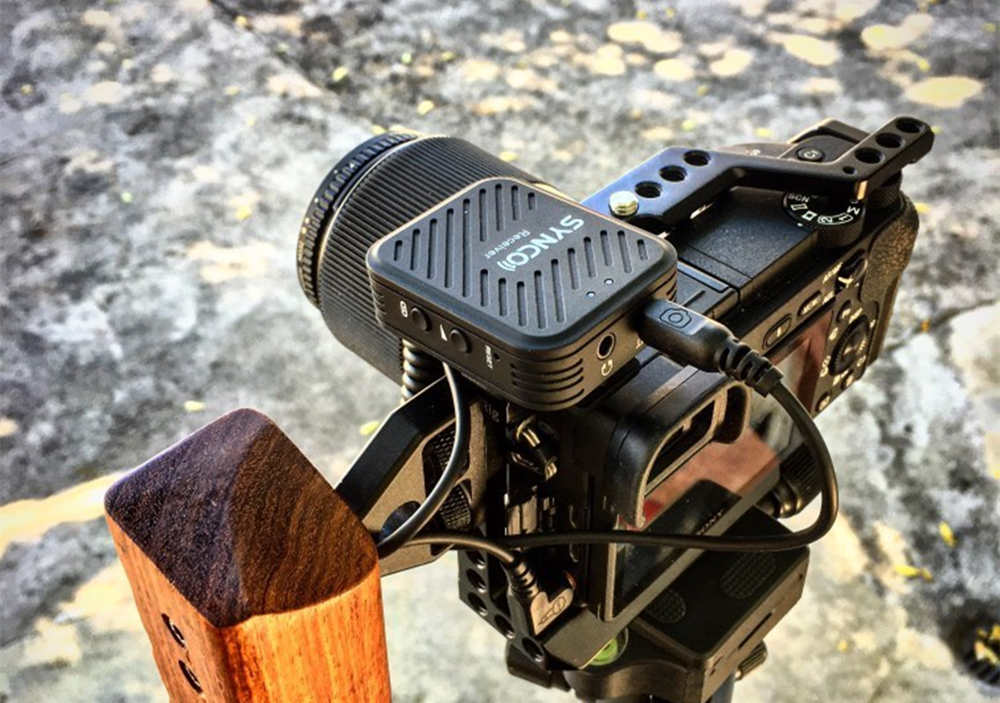
ワイヤレスラペルコンデンサーマイクをカメラに接続する最初のステップは、受信機をデジタル一眼レフカメラに取り付けることです。受信機にはクリップが付いているので、そのクリップを使ってデジタル一眼レフカメラのシューに取り付けることができます。受信機にアンテナが付いている場合は、アンテナを90度回転させてください。
最も重要なのは、正しいケーブル、つまりTRS-TRSケーブルを使うことです。すべてのTRSプラグには2つの黒いリングが付いています。ケーブルの片端をレシーバーの背面にある「出力」と表示されている部分に、もう片端をDSLRの側面にある「マイク」と表示されている部分に接続します。
送信機にラベリアマイクを挿入する穴がある場合は、レベルレイヤーマークのあるマイクポートに挿入してください。送信機にアンテナが付いている場合は、アンテナを回転させて最大範囲を確保してください。その後、電源ボタンを3秒以上押し続けるだけで送信機の電源が入ります。話すとインジケーターライトが点滅し始めれば、送信機が音声を拾っていることがわかります。
送信機背面のクリップを使って、送信機をポケットの側面にクリップで留めます。ラベリアマイクを服の下から通し、Tシャツの襟など、口元にできるだけ近い位置にクリップで留めます。
送信機にマイクが内蔵されている場合は、できるだけ口に近い衣服の上に直接置くことができます。

Moman PhotoGears StoreでSYNCOワイヤレスラペルマイクを購入しましょう
スマートフォン
ラペルマイクをワイヤレスで充電するには、Type CまたはLightningコネクタを使用します。iPhone 7以降、またはヘッドホンジャックのないAndroidスマートフォンをお持ちの場合は、LightningまたはType-Cコネクタ付きのマイクを使用すると接続が大幅に簡単になります。レシーバーを充電ポートに接続するだけで、スマートフォンがiPhoneまたはAndroidスマートフォン用のワイヤレスラペルマイクをデフォルトの録音機器として認識し、録音を開始します。
TRRSケーブルを使って3.5mmジャックに接続します。これも簡単です。2つの手順で完了します。まず、マイクに3つの黒いリングが付いたTRRSコネクタが付いていることを確認し、次にスマートフォンの3.5mmソケットに差し込みます。
アダプターを活用しましょう。ワイヤレスラペルマイクとレシーバーの入力ポートが完全に適合しない場合があります。新しいものを購入するのは現実的ではないため、アダプターを購入することは優れた選択肢です。マイクの出力とスマートフォンのポートに基づいて、必要なアダプターを簡単に判断できます。片方の端がマイクに接続され、もう片方の端がスマートフォンに接続されれば、接続は完了です。
コンピューター
受信機のプラグについて教えてください。パソコン用ワイヤレスラペルマイクには通常、TRRS(チップ、リング、リング、スリーブの略)とUSB(フラット型)の2種類のジャックがあります。対応するポートはほとんどのパソコンに搭載されています。
パソコンの適切なポートを見つけます。通常、パソコンにはピンク色のポートがあり、その上にマイクのアイコンが付いています。TRRS対応のマイクであれば、ポートに接続するだけでサウンドテストを開始できます。
コンピューター用のワイヤレス USB ラペル マイクをお持ちの場合は、2 つ以上の USB ポートが設定されているため、コンピューターの空いている USB ポートに挿入するだけです。
録音した音声を確認してください。サウンド設定で、対象の外付けマイクを既定のデバイスとして選択してください。近くにバーが表示される場合があります。マイクをテストしてください。マイクに向かって話してください。青いバーが上下に動いていれば、正常に動作しています。
コンピューターに最適なワイヤレス ラペル マイクについては、 「コンピューター用ワイヤレス マイク: SYNCO のトップ 4 の選択肢」の記事をご覧ください。

ラペルマイクのワイヤレスを服の下に隠す5つのヒント
より良い映像出力を得るために、 ワイヤレスラペルマイクセットを隠す必要がある場合があります。俳優のシャツの下にワイヤレスラペルマイクを隠す5つの方法をご紹介します。
ラペルマイクをシャツの股下に置く
被写体が厚手のTシャツを着ている場合には、この方法がおすすめです。マイクのケーブルをシャツの背中まで通します。ガムテープを使って、マイクを男性のシャツの股下、鎖骨の横に取り付けます。
鎖骨の近くにマイクを置くと、被写体の衣服があまり動かないため、マイクに擦れる音も少なく、良好な音声を拾うことができます。そのため、この位置は最もよく使われる隠し場所の一つです。
ラベリアラペルマイクワイヤレスをシャツの襟の後ろに隠す
タレントが襟付きシャツを着ているときは、このヒントが効果的です。レシーバーをタレントの背中に置き、ケーブルをシャツの背中まで引き上げます。マイクを襟に通し、片方の端を折り目の少し下にテープで留めます。
ケーブルは後ろから見えることをご留意ください。出演者にブレザーやスーツジャケットを着用してケーブルを隠すことで、この問題を回避できます。
ボタンホールに糸を通す
タレントが濃い色のボタンダウンシャツを着ているときは、この隠し場所を選んでください。ケーブルをシャツの前面に引き出し、ワイヤーをシャツの内側に接着します。マイクはシャツの上部近くのボタンホールに直接通します。
マイクをさらに隠すには、2つのグロメットの間のフラップの下にマイクを折り込みます。マイクの上で布が動くことで発生する擦れ音を防ぐため、モールスキンテープをマイクの周りに巻き付けます。
ネクタイにワイヤレスマイクを内蔵
ネクタイにはマイクを隠すための隠し場所がいくつかあります。内蔵クリップを使ってマイクをネクタイの裏側に留めれば、簡単に解決できます。あるいは、ネクタイの結び目を緩めて、マイクをネクタイの裏側の編み地からぶら下がる程度まで通すこともできます。
接触ノイズを防ぐためにネクタイの中にマイクを隠したい場合は、ラペルマイクの周りにモルスキンテープを巻き付けます。
ラペルマイクにネクタイの結び目を通して給電する場合は、無指向性マイクであることを確認してください。そうでないと、被写体の声を効果的に拾うことができません。
マイクを胸に直接テープで貼り付ける
被験者が薄手のTシャツやトップスを着ている場合には、この方法を試してください。ケーブルをシャツの前面に通し、マイクをシャツの襟のすぐ下の胸にテープで固定します。
この隠れた領域により、個人の声からより多くの低音が録音されることが多くなるため、その効果を求めている場合にも良い選択肢となるかもしれません。